

Get the Tram Running is an objective in Dead Space (2023) (DeadSpace).
Get the Tram Running is an Objective in the Chapter, New Arrivals in Dead Space
Contents
Personal Journal[edit]
- A broken tram car is blocking the whole system. Fortunately, it made it to Tram Repair, but I need get it off the tracks
Walkthrough[edit]
Replace the Damaged Tram[edit]
- Head to the Southeastern corner of the room, across from the Save Station.
- This will bring you into the Tram Tunnel.
- Go through the door.
- Turn to the left and take the ramp down.
- Don't mind the corpse that falls (but do stomp it).
- At the base of the ramp, turn to the right.
- Head toward the barrier in front of you.
- Look on the ground in front of you, just before the door on the tram tracks.
- You will find the Stasis Module on an arm in front of you.
- You'll want to use Stasis to slow the door to get through.
- You can also carefully time running through the door when it is opening.
- Once in this hallway, turn to the left and take the ramp up into the next hallway.
- At the top of the ramp, you will find the Stasis Pack.
- You can use it to refill Stasis if you used it.
- Otherwise, head forward to the Save Station in front of you.
- Going down the hallway to the left, there will be an explosion and the power will go out.
- Turn to the right and look for the blue-lit box on the ground.
- Stomp the box to get potentially a Small Med Kit
- After that, head back to the hallway and turn to the right.
- There is an offline Stasis Recharge Station here, across from the Save Station.
- Head down the hallway toward the Tram Repair Room.
- Wait for another explosion and the power will come back on, giving you access to this room.
- Inside here, go to the right and look for the emergency container on the wall.
- There's one with a Blue Light.
- Open it to claim a Node.
- Turn to the left and take the nearby ramp up
- Stop at the machine bench just before the ramp to find an audio log: Stasis Module Request.
- Be sure that you also open the nearby locked to get some Plasma Energy.
- Opposite, on the crate, you will find to stomp (for Plasma Energy) and you can find Medium Med Pack.
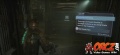
- Go to the up-ramp and head to the control screen on the right.
- Interact with the screen to open the shutters.
- Continue to the right and smash the blue-lit container.
- Head over to the crates nearby in the corner to find 400 Credits on the green crate.
- Look along the railing toward the center of the room where you can find Plasma Energy.
- After this short circuit, head over to the base of the ramp.
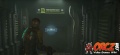
- Just to the right of that you will see the controls for the Claw.
- You will need to use the controls to pull this tram off the track.
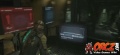
- The problem is this will draw out 3 Slashers, at least one from each side (yes, one's right behind you).
- Try to gather them into a group and hit with with Stasis.
- Quickly aim for their legs and shoot them out.
- Move in after that and stomp them until something drops.
- Run to the other side of the ramps and activate the second claw.
- You might need to reactivate the first claw.
- Reactivating this claw multiples will get Issac a message from Daniels, giving you the log: Autoloader
- After getting them both connected, head to the top of the ramp.
- There is a Stasis Recharge Station opposite the controls at the top of the ramp.
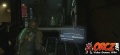
- To get the Claw to grab the Tram car, you will need to extend the claw out then hit it with Stasis.
- While Stasis is in effect, you need to run to the top of the ramp and interact with the control panel on the left.
- Just after you get the Tram Car off the track, you have to deal with 2 more Slashers.
- Another set of Slashers will come out of the vents on entrance side of the Tram Repair Room.
- Defeat them while the new Tram is loaded onto the track.
- This will fix the first problem of a damaged tram causing the whole system to be gridlocked.


- DeadSpaceGettheTramRunningNewArrivals45.jpg


- DeadSpaceGettheTramRunningNewArrivals65.jpg


Find the Data Board[edit]
- From the the Tram Repair Room, head into the Tram Station Hall.
- In the hall, go through the doorway just past the Stasis Recharge Station.
- Get to the base of the ramp and hit the door with Stasis to slow it to easily get through the erratic door.
- On the other side of the door is another Stasis Recharge Station if you need it.
- Head for the base of the ramp that you came down earlier.
- Getting close to it, a Slasher is likely to be crawling out of the floor so be ready for it.
- Go on up the ramp and re-enter the Tram Control Room.
- Inside here, go to the door ahead of you on the right and head on through it.
- This will start you toward the Cargo and Baggage Hall.
- Be on guard as you enter the next hallway.
- Reaching the end, you will see a "corpse", a Slasher laying in wait.
- Shoot off its arms or legs and stomp it.
- Go over to the Circuit Breaker, it only has enough power for either the door to your left or a door your previous passed, the Cargo Hall Storage.
- Take a moment to empower the door you passed and head back along the hallway.
- Be careful since there is another Slasher waiting for you at the end of the hallway.
- Deal with them then get into Cargo Hall Storage.
- Inside here, go across from the door and over to the small container in the wall.
- Open it up to find a Node!
- Go over to the left-hand side of the room to find a Bronze Semiconductor.
- Open up the nearby lockers for a Small Med Pack and 1200 Credits.
- That's everything you can find in here, so head back to the Circuit Board.
- Switch the power from the Cargo Hall Storage to the Maintenance Bay.
- You can see a Save Station just in front of you and then go over to the right to get into the Maintenance Bay itself.
- Inside the maintenance room, go over to the blue-lit box for Credits.
- Head over to the left and start toward the small ramp.
- Just ahead on the right is a another small blue-lit box with Plasma Energy inside it.
- Go on up the ramp after that.
- Go around the corner carefully because there is a Slasher waiting nearby.
- Continue along this walkway to the next maintenance area.
- Inside here, you can find a container on the wall to an item.
- Continue over to the shelves nearby to find 1,400 Credits.
- Over to the right you will find a Blue-Lit Box with Plasma Energy inside it.
- Take the nearby ramp down where you will hear a screech, and a Slasher will be coming up from below.
- A carefully timed shot to an explosive container to quickly kill off the Slasher.
- Go forward and take the ramp down.
- Head forward and take the ramp here down to the next section of the walkway.
- Turn around a listen, there is a Slasher rushing from higher up in the Maintenance Bay.
- Look across from the door in this lower area to spot a Blue-Lit container.
- Smash it open to yield some Plasma Energy.
- Go through the doorway to enter into an elevator.
- Ride this up to get to the top floor of the Maintenance Bay.
- Go to the middle cross-passage on the left.
- Head along this short passage over to the nearby conclave.
- There is a blue-lit container that has Credits inside it.
- Go back to the main walkway and head to the turn.
- At the turn, follow the walkway to the door with the blue power-lines coming from it.
- You will encounter a Slasher that will be shambling toward you on this walkway.
- Deal with them and get to the door.
- There is a Circuit Board in front of you, powering a nearby door.
- Leave the Circuit Board alone (for now) and head over to the right.
- Look on the chair here to find a Log: Repair Invoice
- Head over to the nearby blue-lit container for 100 Credit.
- Go over to the nearby lockers and open them for 100 Credits and Plasma Energy.
- Get over to the nearby Circuit Board.
- Okay, there are a few things that you can do now.
- Activating the Maintenance Room will turn off the lights for the Room.
- Do this for now to start for more collectibles.
- Turn around and head back toward the elevator you took up.
- Be careful because there is a pair of Slashers coming toward you.
- Deal with them now or just save them for later.
- Either way, take the elevator down to the lower level.
- Start heading toward the maintenance room itself.
- Be careful because there is a Slasher is heading toward you.
- You can use the Red Containers on the walkway to quickly incinerate it.
- Be careful because there's another Slasher coming up behind you.
- One more Slasher is coming along the walkway as well.
- Before going into the Maintenance Room Office, go over to the right to find a shutter container with Plasma Energy.
- Open the door into the Office.
- Inside the office, head straight across it to find a container on the wall.
- Inside that container, you will find a Node.
- Go over to the left to find a text log: Poker Night Invite.
- You can also head over the nearby shelf here to find a Marker Fragment 1
- You can find 400 Credits on the shelf to the left of the lockers, Plasma Energy in the right-hand locker, 100 Credits in the left-hand locker.
- Head over to the workbench here to find the Data Board.
- Collect it, and Issac Clarke will get a call from Hammond.


Objectives[edit]
- DeadSpaceGettosafetyNewArrivals.jpg

Get the Tram Running


