

The Objective, “Truth. Symbolize. Is Materialize. Everywhere.” in Destiny 2.
Truth. Symbolize. Is Materialize. Everywhere. is an Objective in the Raid Vow of the Disciple in Destiny 2.
Contents
Summary[edit]
.
Walkthrough[edit]
- Inside this room, you will enter Acquisition.
- You will find yourself in a large arena.
- Head to the banner placement to recharge your grenade, melee, super, and all weapons with ammo.


Set-up[edit]
- Throughout the encounter here, you will need to call out symbols to complete it.
- The fireteam should either use the The Symbol Names or agree on their own.
- EVERYONE NEEDS TO KNOW THE SYMBOLS' NAMES!
- In Acquisition, you can find 3 Obelisks in the area, 1 in the back left, 1 in the back right, and 1 close to the center.
- These will need to be defended throughout the whole encounter.
- Have the fireteam decide who is defending and who is going to be dealing with the callouts.
- Those dealing with the callouts should learn where the Symbol rooms are.
- Be sure people have Unstoppable Mods, since there will be Unstoppable Champions.
- When you are ready to begin the encounter, head to the middle of the arena and shoot the Darkness object floating there.
- All the symbols will be randomize for each encounter, so there is no set sequence to execute on.
Raid Encounter - Acquisitions Obelisks[edit]
- Once the encounter has begun, you will want to watch your Obelisk while defending it from the Scorned that are assaulting it.
- At random, one of the Obelisk will display a symbol, like either Pyramid or Traveler.
- Call out this symbol, because a Taken Knight, the Disciple's Compass has appeared, and needs to be killed.
- The symbol lets you know what side it is on.
- In the middle of the arena, there are the Traveler and Pyramid icons, and the Disciple's Compass will appear on the half of the arena with the symbol that appeared.
- With the Compass defeated, it is back to waiting until the next symbol to appear.
- Below the Traveler/Darkness Symbol, another Symbol will appear.
- Be sure to ask for the Traveler/Darkness Symbol for your Obelisk.
- This gets called out as well, telling whoever is going to head to the room where to go.
- Someone needs to then shoot the Darkness Object in the middle of the arena to open the door leading into the Symbol room.
- Inside the Symbol Room, you need to wait a moment and then a group of Scorn will appear.
- Among their number is a pair of Gylphkeepers.
- Prioritize the Gylphkeepers, but keep the rest of the Scorn in mind, killing them to increase your own survival.
- After defeating the Gylphkeepers (and rapidly clearing a portion of the room), go to the symbols.
- There are 2 Symbols shown, one in shrouded in White (with the Light Symbol) and nearby the Darkness Symbol.
- Based on the Obelisk's showing of Traveler and Darkness, make note of the Symbol displayed either in front of the Traveler or the Darkness.
- The fireteam will need to repeat this process 2 more times, getting a total of 3 Symbols.
- Write down each of these SYMBOLS
- When all 3 Symbols have been completed, it is time for the next step.
- Each of the Obelisks will light up, each displaying different symbols.
- Find the Obelisk with the 3 Symbols you wrote down.
- Next, fireteam members need to shoot the symbols in rapid succession to make the "offering" to the obelisk.
- Done correctly, you will get the message, "An obelisk accepts your offering."
- If the shots are too slow, the input glitches, or its the wrong symbols, you will get the message The obelisk rejects your offering.
- When the "offering" is rejected, the Obelisk will spin, and the symbols on each will change.
- Done wrong 3-4(?) times in a row, the Obelisks will cause a Party wipe, having you restart the encounter.
- Once an Obelisk has accepted an offering, it is sated for the encounter (save for a wipe), and it will not be a factor in the next offering section.
- Repeat this twice more to complete the encounter.

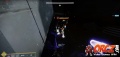


Light Symbol Example

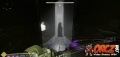
Darkness Symbol Example

Complete Sequence Example

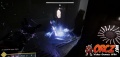
Offering Accepted

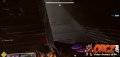
Offering Rejected


Claim the Chest[edit]
- Head to the door between Knowledge and Drink to find the chest.
- Collect the engrams to claim your rewards.
- Head on through the door to progress forward.

Objectives[edit]

Truth. Symbolize. Is Materialize. Everywhere.


