

The Ascendant Chest are scattered throughout the Dreaming City. They contain Dark Fragments, Uncommon Gear, occasionally Legendary Gear and other useful items.
Contents
- 1 Obtaining the Ascendant Chests
- 2 Curse Beginning - Week 1
- 2.1 Chest 1 - Bay of Drowned Wishes
- 2.2 Chest 2 - Divalian Mists
- 2.3 Chest 3 - The Strand
- 2.4 Chest 4 - Aphelion's Rest
- 2.5 Chest 5 - Chamber of Starlight
- 2.6 Chest 6 - Rheasilvia
- 2.7 Chest 7 - Harbinger's Seclude
- 2.8 Chest 8 - The Confluence
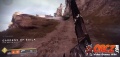
- 2.9 Chest 9 - Gardens of Esila
- 2.10 Chest 10 - Spine of Keres
- 3 Curse Strengthening - Week 2
- 4 Full Curse - Week 3
Obtaining the Ascendant Chests[edit]
- Must have access to the Dreaming City.
- Use the Tincture of Queensfoil, this will grant the Guardian the Ascendance buff.
Curse Beginning - Week 1[edit]
Chest 1 - Bay of Drowned Wishes[edit]
- Found in Divalian Mists, inside the Lost Sector - Bay of Drowned Wishes
- Once inside, head for this rock outcropping with the Pine Tree on it.
- This is just across from the second rock to the right after you emerge into the area.
- Climb up the outcropping.
- Just at the base of the roots, turn to the right and look out into the emptiness.
- Go to the far end of the platform and jump onto the next one.
- On this one, turn to the left.
- On the end of this platform, you will find the Chest.


Chest 2 - Divalian Mists[edit]
- Found nearby the landing zone of Divalian Mist.
- Go to the East from there, toward the building in front of you.
- Go into the entryway of this building.
- Head to the left-hand side of the doorway, and look upwards.
- You will find an Ascendant platform hidden there.
- Jump up onto the platform and turn to the left.
- Look up again to find the next platform.
- GO over to the left and jump to the next platform in front of you.
- From there, spiral upwards to the left.
- Get to the large piece and go to the far end of it.
- At the far end, look up to find the next platform
- Jump up onto it.
- Turn to the right on this platform to find the next one.
- You will find the next platform there.
- Jump over to it and continue to look to the right.
- Jump over the large piece in the middle of the platform.
- Get to the far end and jump onto the next platform.
- Back by the door, turn to the left and jump onto the next platform.
- Look back toward the entrance of the door, on the right-hand side to find the platform.
- Turn to the left on this platform and jump over to the next one.
- Look to the next platform and jump over to it.
- Go to the end of the platform to find the Ascendant Chest.


Chest 3 - The Strand[edit]
- This chest is found in the Strand, just behind Petra Venj.
- Go past her and jump onto the Ascendant Platform.
- Continue forward onto the next platform behind that one.
- Go to the end of this platform to the left and then look up and to the right to find the next platform.
- Jump up to it and turn around.
- Look up just a little to find the next platform.
- Turn to the right and jump over to the next platform.
- Continue along this platform and jump over to the next one.
- Continue over to the far end to the left and jump onto the narrow platform.
- Reach the far end and jump over to the platform at the end.
- Go to the left and the end of this platform.
- Continue turning to the left and jump over to the next few platforms toward the pagoda.
- Continue onto the platforms above the pagoda and reach the end to find the next Ascendant Chest.


Chest 4 - Aphelion's Rest[edit]
- Found in the Strand, inside the Lost Sector: Aphelion's Rest.
- Go through the entrance into the Lost Sector itself.
- Continue through the sector until you reach the section with the large blue glowing section.
- Just across from the large blue section, at the end of the ledge is the Ascendant Chest.


Chest 5 - Chamber of Starlight[edit]
- Found in the Southwestern corner of Rheasilvia, inside the Lost Sector: Chamber of Starlight
- Go inside the Lost Sector and head forward, over the first drop.
- Follow the path through to the Lost Sector itself.
- Once there, follow the path over to the right, and keep to the right as you enter the large purple chamber.
- Continue along the right-hand side wall.
- Go to the end of the balcony and look upwards.
- You will find an Ascendant Platform.
- Jump upwards onto it and look up to the right to find the next platform.
- Jump up onto this platform and turn to the left.
- At the end of this platform, you will find the chest.


Chest 6 - Rheasilvia[edit]
- Found in Rheasilvia, to the right of the entrance of the large white building.
- Turn to the right on the balcony at the location shown.
- Jump over the railing for the small landing you can see the cliff-face in front of you.
- Go to the far end of the landing and turn to the left.
- Jump around the corner, hugging the wall on your left to reach the next platform.
- Either jump along the outcropping to the left or jump straight across the gap to the hovering rock in front of you.
- Continue across to the next outcropping on the following cliff-face.
- Once again, keep to the cliff-side and jump your way over to the landings.
- Jump from the second landing to the small, narrow rock coming out of the clouds.
- Turn around and look up a little and to the right to find the next outcropping.
- Jump onto that and continue over to the right.
- On the second outcropping, turn around and look up to find the next one.
- Jump up onto it and go to the ledge closest to the drop off.
- Turn toward the cloud and move to the edge to find an Ascendant platform.
- Jump over to it and cross over to it.
- Go to the end of it and jump over to the next narrow platform in front of you.
- About the middle of this one, is the next platform to the right.
- Jump over onto it and go to the end of it.
- Jump onto either platform at appears at the end of this platform and go to the end of it.
- Continue to the end of this platform and go to the end of the small platform.
- There you will find the Ascendant chest.


Chest 7 - Harbinger's Seclude[edit]
- Start in front of the large white building in the Northeastern corner of Rhesilvia, the lost sector: Harbinger's Seclude.
- Run inside the building to begin this search.
- Run straight through the first few chambers to the one with the lonely statue.
- Continue past it down the ramp into the chamber beyond.
- Enter into Harbinger's Seclude.
- Turn to the left and start fighting through the Taken to the left.
- Go to the back part of the room and then through the right-hand doorway, where you should see a bonsai tree on a rock in front of you.
- Turn to the right inside this room, moving toward the 3 pillars in front of you.
- Continue straight past the pillars and through the very tall archway there.
- Go down the Bannister stairs on either side, fighting more of the Taken.
- Look to the right-hand area to find a balcony with an archway in front of you.
- Go just past the archway and look to the right.
- You can find an Ascendant Platform beyond the walkway here, so jump out to it.
- Go to the end of this platform and jump to the up and to the right onto the platform (look first to find it).
- Run up this platform and once again, jump off it onto the platform just to the right of it.
- Reach the end of this platform and jump over to the right onto the next platform to the left.
- Go to the end of this one and jump ahead to the next 2 platforms that will materialize in front of you.
- At the end of this one, a number of platforms will be in front of you.
- Go onto the one in front of you and start going over to the right.
- Head to the narrow end of the platform.
- From there, turn to the left and jump up to the next platform.
- Continue to the left and jump up to the next platform.
- Land on the narrow section of the next platform and turn to the right.
- Head to the right from there and jump up onto the narrow platform next to you.
- Just in front of you is the platform with the next Ascendant Chest.
- Jump onto it and collect the chest.


Chest 8 - The Confluence[edit]
- Inside Rhesilvia, you will want to make your way into the Lost Sector: The Confluence.
- Inside the purple regal room with the spiral staircase, drop down to the bottom where you have the bonsai tree in a pond on a rock.
- Proceed down the stairwell to the right of the stairs.
- Drop down the deep hole in front of you, being mindful of your landing.
- Go forward through the archway in front of you into the next room with Taken.
- Turn to the right and run toward the large cave opening there.
- Head toward that entrance, but search the wall along the right-hand side to find a cave entrance.
- Run down this cavern and into the Taken Portal in front of you.
- Turn just to the left after you go through the portal, going into the center of the room.
- Turn to the right and head down the corridor beyond the archway in front of you.
- Run through this corridor and up the stairs to reach the statue in front of you.
- Go around it and up the stairs past it.
- This will bring you into The Confluence.
- In the next chamber, turn to the left and head forward, the narrow section of the pillar nearby on the left.
- Just above the pond next to this pillar you will find an Ascendant Platform.
- Jump up to the platform.
- Turn to the left and jump up to the next platform in that direction.
- Continue forward across the next 2 platforms.
- Turn just to the left to find the next narrow platform.
- Jump up along the next 2 platforms after this narrow platform.
- Turn to the right on the top platform and duck under the archway.
- Follow the next platform under the next archway.
- Continue along the platforms as they lead you through a narrow section.
- After you drop, turn to the left and go under the archway there.
- Look to the right and jump over to the narrow platform there.
- Jump onto the broader platform from there and continue over to the left on the next platform.
- Keep to the left and jump up onto the next platform below the starry dome.
- Turn to the left and look to the end of the platform to find the chest.


Chest 9 - Gardens of Esila[edit]
- From the last chest, drop down onto the ground below.
- Turn to the left and head head through the corridor leading into the room with the large Bonsai Tree.
- Continue forward, past the tree and into the corridor behind it.
- This will leads you into the Gardens of Esila.
- Inside here, turn to the left.
- Continue to the left and into the pink-purple lit room.
- Go to the left in this room as the light clears.
- Run into the Taken Portal you can see there.
- On the other side of the portal, turn to the left and head along the walkway leading outside to the large bonsai tree.
- Look to the right as the railings narrow on that side to find an Ascendant Platform.
- Jump up onto it and go to its end.
- Cross over to the next platform and go to the left, jumping to reach and see the next platform.
- From here, jump to the next 2 narrow platforms.
- Reach the end of the second platform and look a bit to the left to find a third narrow platform.
- Continue in a slow circle to the left, going from the narrow platforms onto a broad one, back to a narrow then another broad.
- Keep reaching the end and turning to the left to reach the following platform.
- Run up the platform and jump onto the platform directly adjacent to it.
- Go to the end of it to find the next Ascendant Chest.


Chest 10 - Spine of Keres[edit]
- Return to the Confluence, in the chamber where you find the Ascendant Chest.
- This time, go down the corridor leading to the large Crystalline Formation.
- Go past the large crystal and into the corridor beyond it.
- Go the corridor here to reach the Spine of Keres, leading toward a very bright light.
- Turn into the right-hand corridor, where you will see a Taken Portal in front of you, if you are Ascendant.
- Go out of the cave that you arrive on the other side.
- Turn to the left and to the edge of the ledge there.
- Just in front of you will be an Ascendant Platform.
- Jump out onto it and go to its end.
- Jump just off it to the left to find the next platform.
- From there, jump onto the land mass with the stairs.
- Turn to the right and head down the stairs.
- Go across the bridge and over to the large lens.
- Run past the large lens and head over to just to the left of the smaller lens on this island.
- Jump from here over to the next floating island and go across it to the one you can see beyond.
- Keep to the left on this island, dealing with the Taken in front of you.
- From the edge of this floating island, jump over to the next one.
- Once again, land and fight the taken on this Island, continuing forward.
- Go across the next island, following the trail on it.
- It will take you around a corner and to face a Taken Captain and Acolyte.
- Fight through the Captain and go to the shore of the island here.
- Turn to the left.
- Keep to the shore, going between this short cliff and rock.
- Run through the misty water, toward the small rock coming out from it.
- Look slightly upwards as you do this, to find an Ascendant Platform above you.
- Jump up to it and turn to the left.
- From there, climb up it onto the semi-visible platform above it.
- Keep to the left and going upwards to find another platform that will be visible.
- On it, turn to the right and go to the end of it.
- Make a long jump from its edge toward the gap between the 2 rocks ahead of you to land on another Ascendant Platform.
- Go through the rocks and turn to the left.
- Keep the rocks on your left and jump onto the platforms that will lead you in a short upward spiral.
- Look to the left at the top of the next one to find the platform leading forward.
- Continue upwards, turning slightly to the right.
- Reach the flat platform from here and go to the left-hand end of it.
- You will find the final chest here.


Curse Strengthening - Week 2[edit]
Bay of Drowned Wishes[edit]
- This chest is found in the Bay of Drowned Wishes.
- Go inside the Lost Sector.
- Head straight forward inside Bay.
- Go up the rocks to the bonsai tree's base.
- At the base of the tree, you will find the chest.


Spine of Keres[edit]
- This Ascendant Chest is found inside the region, Spine of Keres.
- Travel from the Divalian Mists over to Spine of Keres.
- Make your way to the plaza leading into the building with the Oracle Machine.
- Go to the bridge and head off the bridge over to the right.
- Head down the slope to the turn going to the right.
- Look across the way toward the bridge leading toward the islands in the mists.
- Use the hidden bridge that you can find with Ascendance to cross the gap.
- Once at the base of the bridge, head across it to the middle of the it, looking to the left.
- This will lead you to another ascendant bridge.
- Go across it, turning slightly to the left to find the next section of the bridge.
- This will lead to a large circular platform.
- On this platform you will find the Ascendant Chest.


Divalian Mists[edit]
- In the Divalian Mists, head toward the cross over toward Rheasilvia.
- Just to the left of this passage is a series of ledges.
- Go to the first ledge across the gap and turn to the left.
- Jump onto the Ascendant Bridge.
- Turn to the right and jump to the section of the bridge.
- Climb upwards, turning to the right.
- Go up the first few and then turn to the right as you near the mountain face.
- Jump over the large barrier and make your way to the next platform across the narrow walkway.
- Head to the right, jumping onto a platform.
- Make your way over to the left and to the final platform to find a chest.


Rheasilvia[edit]
- This chest is found in Rheasilvia section of the Dreaming City.
- From the end of the cross over from the Divalian Mists, turn to the left.
- Jump out onto the ledge across the first gap.
- From there, go over to the right and toward the next ledge below you, leading toward the tall islands in the mists.
- Jump to the ledge above the tree handing onto the side of the island.
- From there, continue forward, jumping the next gap to the next island.
- Start circling around this island, climbing upwards using the ledges and outcroppings.
- Once on the far side of the island, jump across to the outcropping on the cliff face.
- Head along it to the left, to reach the top section of this, a platform with a Techeun statue on it.
- Continue around this island to the left.
- Go through the narrow passage and forward to the next ledge just past there.
- Looking back toward the first bridge, to find an Ascendant Bridge.
- Jump onto it and over to the second platform.
- Turn to the left on the second large platform with the circular ends.
- Jump across the gap to the next platform.
- Turn to the right on this platform.
- Drop off the end of this platform to find an invisible platform well below you.
- You will find the chest on this platform.


Chamber of Starlight[edit]
- This Ascendant Chest is found in the lost sector, Chamber of Starlight in Rheasilvia.
- Go into the Chamber and make your way to the large chamber where you find the boss and chest.
- Head to the spired plaza on the right-hand size, looking to the Sector Chest.
- Above you is an Ascendant Bridge.
- Start climbing upwards and slowly winds to the left.
- After a few platforms, turn to the right head back to the right.
- Head around to the right, climbing yet higher.
- At the top, you will find a chest sitting on a cross beam at the top of the chamber.


Harbinger's Seclude[edit]
- From Rheasilvia, make your way to the Northern section and into the building here.
- From there, head to the Harbinger's Seclude.
- Make your way into the massive chamber with the circular plazas.
- Go to the left and over to the plaza there.
- Turn to the right, where you will find an Ascendant Bridge leading upwards.
- On this bridge, turn to the left to start climb upwards and continue to the left, spiraling that direction.
- Just a few platforms up you will find the shattered platform with the chest on it.


The Confluence[edit]
- Enter the Confluence and make your way to the chamber with the entrance to the The Shattered Throne, this is just to the left from the entrance chamber.
- Just as you are moving toward the edge of the large circle in the middle of the room, turn around and look up slightly to find an Ascendant Bridge above you.
- Start climbing upwards toward the ring back toward the circular chamber you just exited.
- This will lead you to a large circular platform with a strange cap on it.
- Go across to the far side from where you approach.
- This will let you find a small outcropping that you can drop onto it.
- Turn to the right, to find a ledge you can reach
- Use this ledge to get underneath the cap on the platform.
- In the middle of this platform is the chest.


Gardens of Esila[edit]
- Travel from the Strand to the Gardens of Esila.
- Once there, make your way across the large plaza opposite where you entered.
- From there, you can find an Ascendant Bridge over just one side of it.
- Jump onto the semi-circle piece of it.
- Turn to the right and jump onto the next floating piece of debris.
- Continue forward and jump up onto the next piece.
- Climb up onto the next floating platform to your right.
- Turn to the right and head to the edge of the circular platform.
- You will find the Ascendant Chest there.


The Strand[edit]
- Make your way to the Strand from Rheasilvia.
- Find the rocks with the large Taken Blights on them.
- Climb up onto the rocks with moss on them in front of the rocks with the Taken Blights on it.
- Cross over the gap between the rocks to get onto the one with Taken Blights.
- Climb up it, favoring the left.
- As you approach the towering rock, look to the left of it to find a piece of an Ascendant Bridge.
- Jump up onto it and continue forward.
- Follow the fragments of the bridge to the right for the next 3 pieces.
- Once you climb above the top of the towering rock, look to the left to find the next narrow fragment of the bridge.
- Jump up onto it and follow it to its end.
- At its end, look over to the right, jumping over to the next 4 pieces in that direction.
- The fourth piece has a massive horizontal fragment going upwards.
- Approach it and look to its right.
- You will find a fragment that will let you continue along the path.
- Follow the next few segments of the bridge upwards to the left.
- This will lead you to the top of the broken tower.
- Turn to the left and drop into it, falling onto the ledge just below you.
- Drop down 2 more platforms to find the Ascendant Chest.


Aphelion's Rest[edit]
- Make your way into the Lost Sector of Aphelion's Rest found in The Strand.
- After you pass the narrow overhang and climb up the slope, go to the right-hand side, nearby the next rooftop outcropping.
- Just to the right of that you will find a fragment of an Ascendant Bridge.
- Climb up onto it.
- Turn back toward the entrance and make your way up along the tops of this bridge.
- The third fragment of the bridge will have the Ascendant Chest on it.


Full Curse - Week 3[edit]
Bay of Drowned Wishes[edit]
- This chest is found at the end of the Lost Sector: Bay of Drowned Wishes, found in the boss chamber.
- Either head to the back of the chamber and look toward the entrance having become Ascendant or jump from the ledge above to reach the Ascendant Platforms sitting above the ground.
- Jump out to the platform closest to the entrance of the room to find the Ascendant Chest.


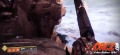
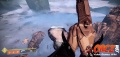
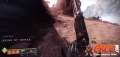
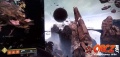
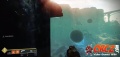
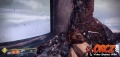
Aphelion's Rest[edit]
- This Lost Sector is found in the Strand.
- Inside this Lost Sector, you will want to head to the back portion of the chamber, behind the Cache.
- Climb up the slope to reach the area above the entrance.
- Turn to the left and look for the Ascendant Platforms.
- Jump onto the narrow Ascendant Platforms.
- There are only 3 narrow Ascendant Platforms that lead to a small flat platform that has the Chest.


- Destiny2FullCurse162.jpg


Chamber of Starlight[edit]
- Head into the Chamber of Starlight Lost Sector within Rheasilvia.
- Once here, you will want to make your way either up to the balcony above the entrance using the lights on either side of it (strand Grapple Grenade) or just fighting through.
- Making it here to the Balcony, you will need to quick deal with the Taken Hobgoblin.
- Turn to the right where you can find the Ascendant Platforms.
- Follow these over to the right to reach a small Ascendant Platform with the Chest.


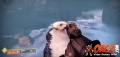
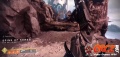
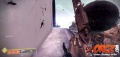
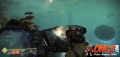
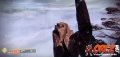
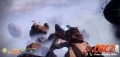
Divalian Mists[edit]
- Climb up above the crossover to the Strand.
- Just as you reach the third ledge above where the mists meet the shore, you will want to turn to the right.
- From there, jump out toward the mists to reveal the narrow Ascendant Platforms.
- On this first platform, turn to the right at the intersection and go to the edge and jump, then continuing across this second narrow platform to reach the first broad platform.
- Run to the far end of the first broad platform.
- At the end, turn to the left and jump onto the narrow platform farther out.
- Go to the end of this, jumping over the block of ascendant platform in front of you and the gap onto the second ascendant platform.
- Turn to the left here and jump to the box-like ascendant platform there.
- Go across this left, jumping the block in your path.
- From there, turn to the left with the platform.
- Jump the gap here and onto the small, flat, ascendant platform.
- Continue forward, just a little to the left, and jump the gap to reveal another Ascendant Platform.
- This one will have the chest on it!


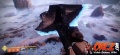


- Destiny2FullCurse22.jpg


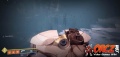


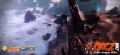
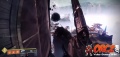
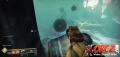
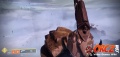
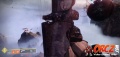
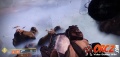
Spine of Keres[edit]
- From Divalian Mists, make your way into the Spine of Keres.
- Make your way to the bridge leading toward The Oracle.
- Look to the left-hand side of the bridge wher you can find the Ascendant Platforms.
- Jump onto the first then run across it, favoring the right to jump and reach the next one.
- Jump up onto the solid platform in front of you and then head to the right.
- Follow the bridges to reach the balcony just outside the upper chambers of the Oracle Engine.
- Turn to the right and long jump to reach the Ascendant platform on the side of the building.
- Now, slowly follow the Ascendant Platforms that are around the building.
- There are 2 that lead out, away from the building, but then you need to turn to the left and jump back to the building.
- Jump onto this one, turn to the right and long jump out to the next platform to the right.
- Turn to the left, toward the large window and jump toward it to find the next platform.
- Here, look to the right and jump out to the final platform.
- This platform has the Ascendant Chest.


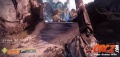


- Destiny2FullCurse58.jpg


- Destiny2FullCurse67.jpg


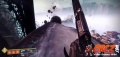


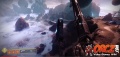
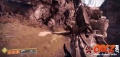
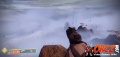
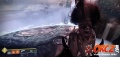
The Strand[edit]
- Make your way to the cross-over point between the Stand and the Gardens of Esila.
- Look out toward the bridge going across the Strand.
- Run to the center of the railing and jump just to the right.
- This will bring you onto a small platform attached to a large Ascendant Column.
- Follow it over to the left, ascending along the platforms on this column.
- Getting to the top, turn to the left and jump up to the Ascendant platform above you.
- Once again, continue forward along the right-hand side of the platform
- Getting to the top of the second column, turn to the right and jump across the small gap to the next column with a platform nearby you.
- Continue climbing up to the left.
- Getting to the top here, turn to the right to find the Ascendant Chest.


- Destiny2FullCurse100.jpg


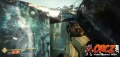


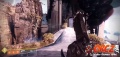
Garden of Esila[edit]
- Head into the Garden of Esila from the Strand.
- Go up the slope and to the first pavilion.
- Once there, look to the left, where you can see to large rocks.
- Go between the rocks and jump out to the rock column between them in the distance.
- Landing here, turn to the right and jump out to the Ascendant Platform there.
- Turn to the right and jump up onto the platform there.
- Turn to the left and jump upwards onto the Ascendant Platforms above you.
- There are a few section here, but you want to favor the right-hand side.
- Jump up to get around and onto the platform above you.
- Jump over the remains of the wall ahead of you and onto the small platform just behind it (or up onto the top of the wall then down onto the small platform).
- Just from there, jump over to the large circular platform.
- On the platform, head over to the right and jump onto the narrow platform over the side, visible from the platform.
- On this criss-crossing platform, head across it over to the right.
- Jump the gap onto the narrow platforms on the other side.
- On this, turn to the right and start around the large Taken Sphere.
- This will bring you to a large series of Ascendant Platforms.
- Climb up and jump up onto the second flat one, then turn to the left and jump onto the next one.
- Climb up onto the remains of the wall, then turn around and jump onto the flat platforms above you.
- Go over to the left to find another small platform that has the Ascendant Chests.


- Destiny2FullCurse153.jpg


Rheasilvia[edit]
- Within Rheasilvia, you will need to maker your way to a central fountain in the back portion.
- You will want to go to the railing overlooking the walkway toward the Hunter's Seclude.
- Jump out over to the walkway below, about the center, just a bit to the right, to find the start of the Ascendant Platforms.
- Follow it to the right and onto the large circular platform.
- Turn to the left and jump to land on another circular platform.
- Turn to the right and jump onto a third circular platform.
- Now, turn to the left to look for the narrow platform.
- Jump onto it and get to the end of it.
- Jump up onto the next narrow platform just in front of you (there are a few around here).
- Continue along this to the right and up onto the next narrow platforms.
- Getting to the end of the narrow platforms, you will find a small flat platform.
- Sitting on there is the Ascendant Chest.


Hunter's Seclude[edit]
- Make your way through Rheasilvia to the entrance of the large building in Rheasilvia.
- There are a few paths here, but you will need to head to the Elevator Shaft within the large chamber (with the massive taken sphere in it).
- Turn around and descend down the elevator shaft.
- Inside here, go to the large circular room.
- Make your way to the far chamber with the skull of .
- Just to the right of the skull, you will find the chest.


The Confluence[edit]
- This Ascendant Chest is found within Hunter's Seclude deepest depths, the Confluence.
- From the portal within the Hunter's Seclude, pass through it to quickly enter the Confluence.
- Once there, go over to the left and down the hallway immediately in front of you.
- Go past the first statue and through to the next chamber.
- Inside this chamber, head over to the left and through the open hallway here.
- Here, you will find the entrance of the Shattered Throne.
- Getting here, you will want to head over to the right of the railing and jump to reach the Ascendant Platforms.
- The first jump brings you over to the small, narrow Ascendant Platform.
- Run across it and jump over to the next one to the right.
- Continue along this path to the pillar on the right and over the small fountain.
- Continue along the path here, with the narrow Ascendant Platforms, and going toward the entrance of the Shattered Throne.
- Turn to the left here and use the Platforms that are crossed in front of you.
- Slowly make your way around the outside of the pillars where you are guided by the platforms.
- Go across the honey-combed section then over to the next platforms, then jump over to the left.
- This does bring you over to a high Ascendant Platform with the Ascendant Chest.


