
m (Text replace - "Format: *[<VIDEOURL><SPACE><TITLE>]" to "Add your video to the list below. Format: *[<VIDEOURL><SPACE><TITLE>]") |
|||
| (12 intermediate revisions by 7 users not shown) | |||
| Line 10: | Line 10: | ||
==Rewards== | ==Rewards== | ||
| − | [[ESO: Soulshriven Signet|Soulshriven Signet]] | + | <strike>[[ESO: Soulshriven Signet|Soulshriven Signet]]</strike> |
| + | |||
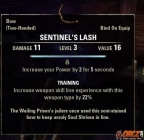
| + | [[ESO: Sealed Urn|Sealed Urn]] - A bag that contains a couple of items from Coldharbour such as the [[ESO: Sentinel's Lash|Sentinel's Lash]], [[ESO: Cadwell's Lost Robe|Cadwell's Lost Robe]], or [[ESO: Unfinished Torment Cuirass|Unfinished Torment Cuirass]]. | ||
| + | |||
| + | {| | ||
| + | |[[File:Esosentinelslash.jpg|x140px|link=ESO: Sentinel's Lash|Sentinel's Lash]]<br><Center>[[ESO: Sentinel's Lash|Sentinel's Lash]]</center> | ||
| + | |[[File:Esounfinishedtormentcuirass.jpg|x140px|link=ESO: Unfinished Torment Cuirass|Unfinished Torment Cuirass]]<br><Center>[[ESO: Unfinished Torment Cuirass|Unfinished Torment Cuirass]]</center> | ||
| + | |[[File:Esocadwellslostrobe.jpg|x140px|link=ESO: Cadwell's Lost Robe|Cadwell's Lost Robe]]<br><Center>[[ESO: Cadwell's Lost Robe|Cadwell's Lost Robe]]</center> | ||
| + | |[[File:Esoerjaseenswornjack.jpg|x140px|link=ESO: Er-Jaseen's Worn Jack|Er-Jaseen's Worn Jack]]<br><Center>[[ESO: Er-Jaseen's Worn Jack|Er-Jaseen's Worn Jack]]</center> | ||
| + | |} | ||
==Objectives/Tasks== | ==Objectives/Tasks== | ||
| Line 41: | Line 50: | ||
*[[ESO: Get to the Anchor Base|Get to the Anchor Base]] | *[[ESO: Get to the Anchor Base|Get to the Anchor Base]] | ||
*<strike>[[ESO: Defeat the Anchor Guardian|Defeat the Anchor Guardian]]</strike> | *<strike>[[ESO: Defeat the Anchor Guardian|Defeat the Anchor Guardian]]</strike> | ||
| − | *[[ESO: Defeat the Anchor Guardians|Defeat the Anchor Guardians]] | + | *[[ESO: Defeat the Anchor Guardians|Defeat the Anchor Guardians]] (Hints: [[ESO: Defeat the Skeletons|Defeat the Skeletons]], [[ESO: Defeat the Child of Bones|Defeat the Child of Bones]]) |
*[[ESO: Talk to Prophet After Defeating Anchor Guardian|Talk to the Prophet]] | *[[ESO: Talk to Prophet After Defeating Anchor Guardian|Talk to the Prophet]] | ||
*[[ESO: Collect the Skyshard|Collect the Skyshard]] | *[[ESO: Collect the Skyshard|Collect the Skyshard]] | ||
| − | *[[ESO: Talk to Prophet After Collecting Skyshard|Talk to the Prophet]] | + | *<strike>[[ESO: Talk to Prophet After Collecting Skyshard|Talk to the Prophet]]</strike> |
| − | *[[ESO: Activate the West Anchor Device|Activate the West Anchor Device]] | + | *<strike>[[ESO: Activate the West Anchor Device|Activate the West Anchor Device]]</strike> |
| − | *[[ESO: Activate the East Anchor Device|Activate the East Anchor Device]] | + | *<strike>[[ESO: Activate the East Anchor Device|Activate the East Anchor Device]]</strike> |
*[[ESO: Wait for the Prophet|Wait for the Prophet]] | *[[ESO: Wait for the Prophet|Wait for the Prophet]] | ||
*[[ESO: Approach the Portal|Approach the Portal]] | *[[ESO: Approach the Portal|Approach the Portal]] | ||
| Line 72: | Line 81: | ||
[[ESO: Feral Shriven|Feral Shriven]] | [[ESO: Feral Shriven|Feral Shriven]] | ||
| − | [[ESO: Anchor Guardian|Anchor Guardian]] | + | <strike>[[ESO: Anchor Guardian|Anchor Guardian]]</strike> |
| + | |||
| + | [[ESO: Skeletal Pyromancer|Skeletal Pyromancer]] | ||
| + | |||
| + | [[ESO: Skeletal Cryomancer|Skeletal Cryomancer]] | ||
| + | |||
| + | [[ESO: Child of Bones|Child of Bones]] | ||
==Areas== | ==Areas== | ||
| Line 90: | Line 105: | ||
[[ESO: The Anchor Mooring|The Anchor Mooring]] | [[ESO: The Anchor Mooring|The Anchor Mooring]] | ||
| + | |||
| + | ==Videos== | ||
| + | <!-- | ||
| + | ADMIN MESSAGE - READ BEFORE ADDING YOUR VIDEO! | ||
| + | Before adding a link to your video below, you MUST put a link back to this page in the video description. | ||
| + | Videos without the link will be removed. | ||
| + | |||
| + | Add your video to the list below. Format: | ||
| + | *[<VIDEOURL><SPACE><TITLE>] | ||
| + | --> | ||
| + | |||
| + | *[https://www.youtube.com/watch?v=Pi_R8hjDXz4 Dark Elf Sorcerer - Soul Shriven in Coldharbour Part 1 - OrczWiki] | ||
| + | *[https://www.youtube.com/watch?v=IH0sN1CPP5U Dark Elf Sorcerer - Soul Shriven in Coldharbour Part 2 - OrczWiki] | ||
[[Category:The Elder Scrolls Online]] | [[Category:The Elder Scrolls Online]] | ||
| Line 95: | Line 123: | ||
[[Category:TESO Level 1 Quests]] | [[Category:TESO Level 1 Quests]] | ||
[[Category:TESO Quest Database]] | [[Category:TESO Quest Database]] | ||
| + | [[Category:TESO The Wailing Prison]] | ||
| + | [[Category:TESO Main Story Quests]] | ||
Latest revision as of 01:02, 3 April 2014

Soul Shriven in Coldharbour is the first quest in The Elder Scrolls Online
Zone[edit]
The Wailing Prison - Coldharbour
Level[edit]
Level 1
Rewards[edit]
Sealed Urn - A bag that contains a couple of items from Coldharbour such as the Sentinel's Lash, Cadwell's Lost Robe, or Unfinished Torment Cuirass.
 |
 |
 |
 |
Objectives/Tasks[edit]
- Search the Cell
- Talk to The Prophet
- Leave the Cell
- Choose and Equip a Weapon
- Escape the Prison
- Fight the Skeletal Warrior
- Continue through the Bleeding Forge
- Fight the Skeletal Archer
- Talk to Lyris
Enter the Ashen Mines(Removed patch 0.181)- Reach the Towers of Eyes
- Destroy a Coldharbour Sentinel
- Talk to Lyris (optional step)
- Reach the Prophet's Cell
- Talk to Lyris Titanborn
- Talk to Cadwell
- Enter the Undercroft
- Enter the Prophet's Cell
- Find The Prophet
- Talk to Lyris
- Disable North Anchor Pinion
- Disable South Anchor Pinion
- Return to Lyris and Observe the Exchange
- Talk to The Prophet
- Enter the Anchor Mooring
Go to the Mooring Base- Get to the Anchor Base
Defeat the Anchor Guardian- Defeat the Anchor Guardians (Hints: Defeat the Skeletons, Defeat the Child of Bones)
- Talk to the Prophet
- Collect the Skyshard
Talk to the ProphetActivate the West Anchor DeviceActivate the East Anchor Device- Wait for the Prophet
- Approach the Portal
- Use the Rift to Escape to Tamriel
- Talk to the Prophet
NPCs[edit]
The Prophet (Astral Projection)
Enemies[edit]
Areas[edit]
Prison Cell (Start Location)


