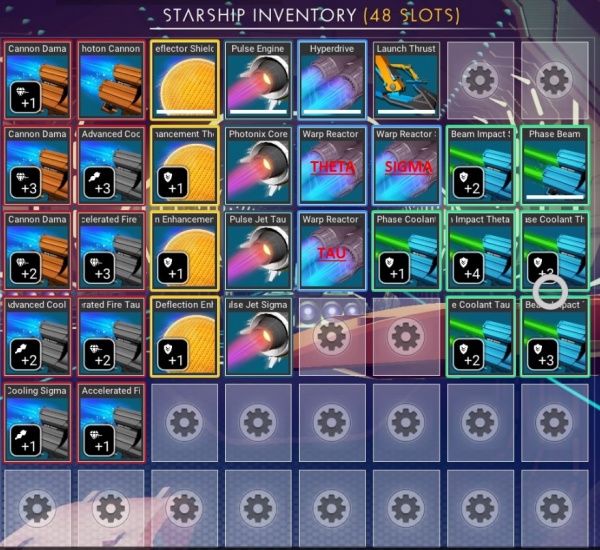
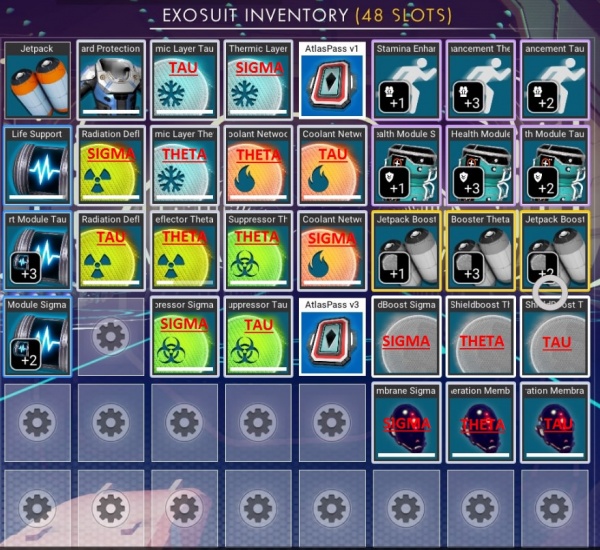
Inventory placement refers to the position of all your blueprints/upgrades in your inventories in No Man's Sky.
Arranging your inventory properly can give you substantial bonuses as the various components and upgrades have synergy and get a boost when placed next to each other in proper slot formation.
When the borders of similar upgrades are touching, they'll light up indicating synergy. The more upgrades that are touching, the more "powerful" the end result will be.
See below for examples of optimal inventory placement for your Staship Inventory, Exosuit Inventory, and Multitool Inventory.
Note: Credit for the screenshots of the inventory placements below go to reddit user /u/konami9407 from the NoMansSkyTheGame Subreddit.
Starship
- Photon Canon is in a fixed slot, hence the 2 columns.
- Deflector Shield is fixed as well, so 1 column. They are all +1.
- Pulse Jet could've had a bigger bonus had it been placed in a cross shape but it would have blocked either Hyperdrive or Deflector Shield. Those 2 are more important so I placed Pulse Jet in a column.
- Hyperdrive in a cross shape for maximum distance during warps.
- Phase Beam placed to get the most out of Beam Impact Theta, which is a +4 and having a +25% bonus on all sides becomes a +8.
Exosuit
- Hazard Protection blueprints all stack.
- Aeration Membrane blueprints have the same material requirements as Hazard Protection, but they DO NOT stack with them.
- Even if they are both purple, Stamina Enhancement and Health Module DO NOT stack.
- Theta upgrades should always be in the middle to get the best possible bonuses from adjacent bluprints on all sides.
Multi-Tool
- 54 total blueprints for a 24 max slots Multi-Tool had me take some decisions.
- Boltcaster has a worse overall blueprint set so I ignored it entirely.
- Maximizing overall damage and mining speed on the Mining Beam upgrades. You should be able to kill Animals and Sentinel Dronesin under 1 second, Sentinel Quadrupedals in under 2 seconds and Sentinel Walkers in under 3 seconds.
- Crystals should also break immediately and you should be able to keep firing for over 10 seconds without overheating.
- Grenades with Propulsion and Damage Radius for maximum terrain destruction.
- Scanner has maxed length.
Strategy Guide/Tips
- The best with five upgrades is a cross, and with 9 is a 3x3 square, so I'm torn between saying a 2x2 or a half cross. I'd say if you're using the multitool, and you're talking mining beam/boltcaster upgrades, I'd use the half cross in an open area so that you can eventually put it to the 3x3, otherwise, use a 2x2 square.
- Even without the upgrades touching the function they're meant to be upgrading, you still get some synergy, so long as there are two or more upgrades touching. For instance, in my Exosuit I have two Stamina upgrades touching with a purple border. There isn't a real base Stamina function like there is for your Jetpack or Life Support, but I'm still getting synergy because those two upgrades are touching each other. As far as how much synergy you get, I don't think anyone is really certain how to gauge the overall outcome, aside from the circular gauges that have colors going around them.
- If you put similar modules next to each other in your suit/ship/multitool inventory, you get an additional stat boost. For example having two stamina modules next to each other highlights their borders with a pink/purple glow. The boost due to the adjacency is shown by the gray portion of the stamina bar.


