(→Ridgeland Tower Shrines) |
m (→Woodland Tower Shrines) |
||
| (21 intermediate revisions by 6 users not shown) | |||
| Line 8: | Line 8: | ||
| [[Breath of the Wild: Oman Au Shrine|Oman Au]]||[[Breath of the Wild: Magnesis Trial|Magnesis Trial]] | | [[Breath of the Wild: Oman Au Shrine|Oman Au]]||[[Breath of the Wild: Magnesis Trial|Magnesis Trial]] | ||
|- | |- | ||
| − | | [[Breath of the Wild: Ja Baij Shrine|Ja | + | | [[Breath of the Wild: Ja Baij Shrine|Ja Baij]]||[[Breath of the Wild: Bomb Trial|Bomb Trial]] |
|- | |- | ||
| [[Breath of the Wild: Owa Daim Shrine|Owa Daim]]||[[Breath of the Wild: Stasis Trial|Stasis Trial]] | | [[Breath of the Wild: Owa Daim Shrine|Owa Daim]]||[[Breath of the Wild: Stasis Trial|Stasis Trial]] | ||
| Line 36: | Line 36: | ||
| [[Breath of the Wild: Ta'loh Naeg Shrine|Ta'Loh Naeg]]||[[Breath of the Wild: Ta'loh Naeg's Teaching Trial|Ta'loh Naeg's Teaching]] | | [[Breath of the Wild: Ta'loh Naeg Shrine|Ta'Loh Naeg]]||[[Breath of the Wild: Ta'loh Naeg's Teaching Trial|Ta'loh Naeg's Teaching]] | ||
|- | |- | ||
| − | | [[Breath of the Wild: Lakna Rokee Shrine|Lakna Rokee]]||[[Breath of the Wild: | + | | [[Breath of the Wild: Lakna Rokee Shrine|Lakna Rokee]]||[[Breath of the Wild: Lakna Rokee's Blessing Trial|Lakna Rokee's Blessing]] |
|- | |- | ||
| [[Breath of the Wild: Toto Sah Shrine|Toto Sah]]||[[Breath of the Wild: Toto Sah Apparatus Trial|Toto Sah Apparatus]] | | [[Breath of the Wild: Toto Sah Shrine|Toto Sah]]||[[Breath of the Wild: Toto Sah Apparatus Trial|Toto Sah Apparatus]] | ||
| Line 48: | Line 48: | ||
| align="center" style="background:#f0f0f0;"|'''Notes''' | | align="center" style="background:#f0f0f0;"|'''Notes''' | ||
|- | |- | ||
| − | | Myahm | + | | [[Breath of the Wild: Myahm Agana Shrine|Myahm Agana]]||[[Breath of the Wild: Myahm Agana Apparatus Trial|Myahm Agana Apparatus]] |
|- | |- | ||
| − | | Mezza Lo||Ancient Trifecta | + | | [[Breath of the Wild: Mezza Lo Shrine|Mezza Lo]]||[[Breath of the Wild: Ancient Trifecta Trial|Ancient Trifecta]] |
|- | |- | ||
| − | | Tahno O'ah||Tahno O'ah's Blessing | + | | [[Breath of the Wild: Tahno O'ah Shrine|Tahno O'ah]]||[[Breath of the Wild: Tahno O'ah's Blessing Trial|Tahno O'ah's Blessing]] |
|- | |- | ||
| − | | Chaas Qeta||A Major Test of Strength | + | | [[Breath of the Wild: Chaas Qeta Shrine|Chaas Qeta]]||[[Breath of the Wild: A Major Test of Strength Chaas Qeta Trial|A Major Test of Strength]] |
|- | |- | ||
| − | | Jitan Sa'mi||Jitan Sa'mi's Blessing | + | | [[Breath of the Wild: Jitan Sa'mi Shrine|Jitan Sa'mi]]||[[Breath of the Wild: Jitan Sa'mi's Blessing Trial|Jitan Sa'mi's Blessing]] |
|- | |- | ||
| − | | Dow Na' | + | | [[Breath of the Wild: Dow Na'eh Shrine|Dow Na'eh]]||[[Breath of the Wild: Three Boxes Trial|Three Boxes]] |
|- | |- | ||
| − | | Kam Urog||Trial of Passage | + | | [[Breath of the Wild: Kam Urog Shrine|Kam Urog]]||[[Breath of the Wild: Trial of Passage|Trial of Passage]] |
|} | |} | ||
| Line 70: | Line 70: | ||
| align="center" style="background:#f0f0f0;"|'''Notes''' | | align="center" style="background:#f0f0f0;"|'''Notes''' | ||
|- | |- | ||
| − | | Ne' | + | | [[Breath of the Wild: Ne'ez Yohma Shrine|Ne'ez Yohma]]||[[Breath of the Wild: Pushing Power Trial|Pushing Power]] |
|- | |- | ||
| − | | Rucco Maag||Five Flames | + | | [[Breath of the Wild: Rucco Maag Shrine|Rucco Maag]]||[[Breath of the Wild: Five Flames Trial|Five Flames]] |
|- | |- | ||
| − | | Soh Kofi||A Minor Test of Strength | + | | [[Breath of the Wild: Soh Kofi Shrine|Soh Kofi]]||[[Breath of the Wild: A Minor Test of Strength Soh Kofi Trial|A Minor Test of Strength]] |
|- | |- | ||
| − | | Kah Mael||Drop and Rise | + | | [[Breath of the Wild: Kah Mael Shrine|Kah Mael]]||[[Breath of the Wild: Drop and Rise Trial|Drop and Rise]] |
|- | |- | ||
| − | | Kaya Wan||Shields from Water | + | | [[Breath of the Wild: Kaya Wan Shrine|Kaya Wan]]||[[Breath of the Wild: Shields from Water Trial|Shields from Water]] |
|- | |- | ||
| − | | Sheh Rata||Speed of Light | + | | [[Breath of the Wild: Sheh Rata Shrine|Sheh Rata]]||[[Breath of the Wild: Speed of Light Trial|Speed of Light]] |
|- | |- | ||
| − | | Daka Tuss||Sunken Scoop | + | | [[Breath of the Wild: Daka Tuss Shrine|Daka Tuss]]||[[Breath of the Wild: Sunken Scoop Trial|Sunken Scoop]] |
|- | |- | ||
| − | | Shai Yota||Shai Yota's Blessing | + | | [[Breath of the Wild: Shai Yota Shrine|Shai Yota]]||[[Breath of the Wild: Shai Yota's Blessing Trial|Shai Yota's Blessing]] |
|- | |- | ||
| − | | Dagah Keek||Dagah Keek's Blessing | + | | [[Breath of the Wild: Dagah Keek Shrine|Dagah Keek]]||[[Breath of the Wild: Dagah Keek's Blessing Trial|Dagah Keek's Blessing]] |
|} | |} | ||
| Line 102: | Line 102: | ||
| [[Breath of the Wild: Shoda Sah Shrine|Shoda Sah]]||[[Breath of the Wild: Impeccable Timing Shrine|Impeccable Timing]] | | [[Breath of the Wild: Shoda Sah Shrine|Shoda Sah]]||[[Breath of the Wild: Impeccable Timing Shrine|Impeccable Timing]] | ||
|- | |- | ||
| − | | [[Breath of the Wild: Kah Yah Shrine|Kah Yah]]||[[Breath of the Wild: Quick Thinking | + | | [[Breath of the Wild: Kah Yah Shrine|Kah Yah]]||[[Breath of the Wild: Quick Thinking Trial|Quick Thinking]] |
|- | |- | ||
| [[Breath of the Wild: Tawa Jinn Shrine|Tawa Jinn]]||[[Breath of the Wild: Tawa Jinn's Blessing Trial|Tawa Jinn's Blessing]] | | [[Breath of the Wild: Tawa Jinn Shrine|Tawa Jinn]]||[[Breath of the Wild: Tawa Jinn's Blessing Trial|Tawa Jinn's Blessing]] | ||
| Line 108: | Line 108: | ||
| [[Breath of the Wild: Korgu Chideh Shrine|Korgu Chideh]]||[[Breath of the Wild: Korgu Chideh's Blessing Trial|Korgu Chideh's Blessing]] | | [[Breath of the Wild: Korgu Chideh Shrine|Korgu Chideh]]||[[Breath of the Wild: Korgu Chideh's Blessing Trial|Korgu Chideh's Blessing]] | ||
|- | |- | ||
| − | | [[Breath of the Wild: Shai Utoh Shrine|Shai Utoh]]||[[Breath of the Wild:Halt the Tilt Trial|Halt the Tilt]] | + | | [[Breath of the Wild: Shai Utoh Shrine|Shai Utoh]]||[[Breath of the Wild: Halt the Tilt Trial|Halt the Tilt]] |
|- | |- | ||
| [[Breath of the Wild: Muwo Jeem Shrine|Muwo Jeem]]||[[Breath of the Wild: A Modest Test of Strength Muwo Jeem Trial|A Modest Test of Strength]] | | [[Breath of the Wild: Muwo Jeem Shrine|Muwo Jeem]]||[[Breath of the Wild: A Modest Test of Strength Muwo Jeem Trial|A Modest Test of Strength]] | ||
| Line 152: | Line 152: | ||
| [[Breath of the Wild: Kema Zoos Shrine|Kema Zoos]]||[[Breath of the Wild: A Delayed Puzzle Trial|A Delayed Puzzle]] | | [[Breath of the Wild: Kema Zoos Shrine|Kema Zoos]]||[[Breath of the Wild: A Delayed Puzzle Trial|A Delayed Puzzle]] | ||
|- | |- | ||
| − | | [[Breath of the Wild: Raqa Zunzo | + | | [[Breath of the Wild: Raqa Zunzo Shrine|Raqa Zunzo]]||[[Breath of the Wild: Raqa Zunzo's Blessing Trial|Raqa Zunzo's Blessing]] |
|- | |- | ||
| [[Breath of the Wild: Hawa Koth Shrine|Hawa Koth]]||[[Breath of the Wild: The Current Solution Trial|The Current Solution]] | | [[Breath of the Wild: Hawa Koth Shrine|Hawa Koth]]||[[Breath of the Wild: The Current Solution Trial|The Current Solution]] | ||
| Line 178: | Line 178: | ||
| [[Breath of the Wild: Sho Dantu Shrine|Sho Dantu]]||[[Breath of the Wild: Two Bombs Trial|Two Bombs]] | | [[Breath of the Wild: Sho Dantu Shrine|Sho Dantu]]||[[Breath of the Wild: Two Bombs Trial|Two Bombs]] | ||
|- | |- | ||
| − | | [[Breath of the Wild: Keeha Yoog | + | | [[Breath of the Wild: Keeha Yoog Shrine|Keeha Yoog]]||[[Breath of the Wild: Keeha Yoog's Blessing Trial|Keeha Yoog's Blessing]] |
|- | |- | ||
| [[Breath of the Wild: Joloo Nah Shrine|Joloo Nah]]||[[Breath of the Wild: Joloo Nah Apparatus Trial|Joloo Nah Apparatus]] | | [[Breath of the Wild: Joloo Nah Shrine|Joloo Nah]]||[[Breath of the Wild: Joloo Nah Apparatus Trial|Joloo Nah Apparatus]] | ||
| Line 196: | Line 196: | ||
| [[Breath of the Wild: Kaam Ya'tak Shrine|Kaam Ya'tak]]||[[Breath of the Wild: Trial of Power|Trial of Power]] | | [[Breath of the Wild: Kaam Ya'tak Shrine|Kaam Ya'tak]]||[[Breath of the Wild: Trial of Power|Trial of Power]] | ||
|- | |- | ||
| − | | [[Breath of the Wild: Noya Neha Shrine|Noya Neha]]||[[Breath of the Wild: A Minor Test of Strength Noya Neha|A Minor Test of Strength]] | + | | [[Breath of the Wild: Noya Neha Shrine|Noya Neha]]||[[Breath of the Wild: A Minor Test of Strength Noya Neha Trial|A Minor Test of Strength]] |
|- | |- | ||
| [[Breath of the Wild: Dah Kaso Shrine|Dah Kaso]]|| [[Breath of the Wild: A Minor Test of Strength Trial|A Minor Test of Strength]] | | [[Breath of the Wild: Dah Kaso Shrine|Dah Kaso]]|| [[Breath of the Wild: A Minor Test of Strength Trial|A Minor Test of Strength]] | ||
| Line 206: | Line 206: | ||
| [[Breath of the Wild: Namika Ozz Shrine|Namika Ozz]]||[[Breath of the Wild: A Modest Test of Strength Namika Ozz Trial|A Modest Test of Strength]] | | [[Breath of the Wild: Namika Ozz Shrine|Namika Ozz]]||[[Breath of the Wild: A Modest Test of Strength Namika Ozz Trial|A Modest Test of Strength]] | ||
|- | |- | ||
| − | | [[Breath of the Wild: Saas Ko'sah Shrine|Saas Ko' | + | | [[Breath of the Wild: Saas Ko'sah Shrine|Saas Ko'sah]]||[[Breath of the Wild: A Major Test of Strength Saas Ko'sah Trial|A Major Test of Strength]] |
|} | |} | ||
| Line 238: | Line 238: | ||
| align="center" style="background:#f0f0f0;"|'''Notes''' | | align="center" style="background:#f0f0f0;"|'''Notes''' | ||
|- | |- | ||
| − | | Akh Va'quot||Windmills | + | | [[Breath of the Wild: Akh Va'quot Shrine|Akh Va'quot]]||[[Breath of the Wild: Windmills Trial|Windmills]] |
|- | |- | ||
| − | | Bareeda Naag||Cannon | + | | [[Breath of the Wild: Bareeda Naag Shrine|Bareeda Naag]]||[[Breath of the Wild: Cannon Trial|Cannon]] |
|- | |- | ||
| − | | Sha Warvo||Path of Hidden Winds | + | | [[Breath of the Wild: Sha Warvo Shrine|Sha Warvo]]||[[Breath of the Wild: Path of Hidden Winds Trial|Path of Hidden Winds]] |
|- | |- | ||
| − | | Voo Lota||The Winding Route | + | | [[Breath of the Wild: Voo Lota Shrine|Voo Lota]]||[[Breath of the Wild: The Winding Route Trial|The Winding Route]] |
|- | |- | ||
| − | | Kah Okeo||Wind Guide | + | | [[Breath of the Wild: Kah Okeo Shrine|Kah Okeo]]||[[Breath of the Wild: Wind Guide Trial|Wind Guide]] |
|- | |- | ||
| − | | Tena Ko'sah||A Major Test of Strength | + | | [[Breath of the Wild: Tena Ko'sah Shrine|Tena Ko'sah]]||[[Breath of the Wild: A Major Test of Strength Tena Ko'sah Trial|A Major Test of Strength]] |
|} | |} | ||
| Line 258: | Line 258: | ||
| align="center" style="background:#f0f0f0;"|'''Notes''' | | align="center" style="background:#f0f0f0;"|'''Notes''' | ||
|- | |- | ||
| − | | Hia Miu||A Major Test of Strength | + | | [[Breath of the Wild: Hia Miu Shrine|Hia Miu]]||[[Breath of the Wild: A Major Test of Strength Hia Miu Trial|A Major Test of Strength]] |
|- | |- | ||
| − | | Qaza Tokki||Qaza Tokki's Blessing | + | | [[Breath of the Wild: Qaza Tokki Shrine| Qaza Tokki]]||[[Breath of the Wild: Qaza Tokki's Blessing Trial|Qaza Tokki's Blessing]] |
|- | |- | ||
| − | | Mozo Shenno||A Major Test of Strength | + | | [[Breath of the Wild: Mozo Shenno Shrine|Mozo Shenno]]||[[Breath of the Wild: A Major Test of Strength Mozo Shenno Trial|A Major Test of Strength]] |
|- | |- | ||
| − | | Shada Naw||Red Giveaway | + | | [[Breath of the Wild: Shada Naw Shrine|Shada Naw]]||[[Breath of the Wild: Red Giveaway Trial|Red Giveaway]] |
|- | |- | ||
| − | | Sha Gehma||Shift and Lock | + | | [[Breath of the Wild: Sha Gehma Shrine|Sha Gehma]]||[[Breath of the Wild: Shift and Lock Trial|Shift and Lock]] |
|- | |- | ||
| − | | Goma | + | | [[Breath of the Wild: Goma Asaagh Shrine|Goma Asaagh]]||[[Breath of the Wild: A Major Test of Strength Goma Assagh Trial|A Major Test of Strength]] |
|- | |- | ||
| − | | To Quomo||To Quomo's Blessing | + | | [[Breath of the Wild: To Quomo Shrine|To Quomo Shrine]]||[[Breath of the Wild: To Quomo's Blessing Trial|To Quomo's Blessing]] |
|- | |- | ||
| − | | Rok Uwog||Power of Reach | + | | [[Breath of the Wild: Rok Uwog Shrine|Rok Uwog]]||[[Breath of the Wild: Power of Reach Trial|Power of Reach]] |
|- | |- | ||
| − | | Maka Rah||Steady Thy Heart | + | | [[Breath of the Wild: Maka Rah Shrine|Maka Rah]]||[[Breath of the Wild: Steady Thy Heart Trial|Steady Thy Heart]] |
|- | |- | ||
| − | | Rin Oyaa||Directing the Wind | + | | [[Breath of the Wild: Rin Oyaa Shrine|Rin Oyaa]]||[[Breath of the Wild: Directing the Wind Trial|Directing the Wind]] |
|- | |- | ||
| − | | Lanno Kooh||Lanno | + | | [[Breath of the Wild: Lanno Kooh Shrine|Lanno Kooh]]||[[Breath of the Wild: Lanno Kooh's Blessing Trial|Lanno Kooh's Blessing]] |
|- | |- | ||
| − | | Dunba Taag||Build and Release | + | | [[Breath of the Wild: Dunba Taag Shrine|Dunba Taag]]||[[Breath of the Wild: Build and Release Trial|Build and Release]] |
|- | |- | ||
| − | | Gee Ha'rah||Tandem | + | | [[Breath of the Wild: Gee Ha'rah Shrine|Gee Ha'rah]]||[[Breath of the Wild: Tandem Trial|Tandem]] |
|} | |} | ||
| Line 292: | Line 292: | ||
| align="center" style="background:#f0f0f0;"|'''Notes''' | | align="center" style="background:#f0f0f0;"|'''Notes''' | ||
|- | |- | ||
| − | | [[Breath of the Wild: Mirro Shaz Shrine|Mirro Shaz]]||[[Breath of the Wild: Tempered Power Trial| | + | | [[Breath of the Wild: Mirro Shaz Shrine|Mirro Shaz]]||[[Breath of the Wild: Tempered Power Trial|Tempered Power]] |
|- | |- | ||
| [[Breath of the Wild: Monya Toma Shrine|Monya Toma]]||[[Breath of the Wild: Drawing Parabolas Trial|Drawing Parabolas]] | | [[Breath of the Wild: Monya Toma Shrine|Monya Toma]]||[[Breath of the Wild: Drawing Parabolas Trial|Drawing Parabolas]] | ||
| Line 316: | Line 316: | ||
| align="center" style="background:#f0f0f0;"|'''Notes''' | | align="center" style="background:#f0f0f0;"|'''Notes''' | ||
|- | |- | ||
| − | | Tah Muhl||Passing the Flame | + | | [[Breath of the Wild: Tal Mulh Shrine|Tah Muhl]]||[[Breath of the Wild: Passing the Flame Trial|Passing the Flame]] |
|- | |- | ||
| − | | Qua Raym||A Balanced Approach | + | | [[Breath of the Wild: Qua Raym Shrine|Qua Raym]]||[[Breath of the Wild: A Balanced Approach Trial|A Balanced Approach]] |
|- | |- | ||
| − | | Kayra Mah||Greedy Hill | + | | [[Breath of the Wild: Kayra Mah Shrine|Kayra Mah]]||[[Breath of the Wild: Greedy Hill Trial|Greedy Hill]] |
|- | |- | ||
| − | | Gorae Torr||Gorae Torr's Blessing | + | | [[Breath of the Wild: Gorae Torr Shrine|Gorae Torr]]||[[Breath of the Wild: Gorae Torr's Blessing Trial|Gorae Torr's Blessing]] |
|- | |- | ||
| − | | Daqa Koh||Stalled Flight | + | | [[Breath of the Wild: Daqa Koh Shrine|Daqa Koh]]||[[Breath of the Wild: Stalled Flight Trial|Stalled Flight]] |
|- | |- | ||
| − | | Mo' | + | | [[Breath of the Wild: Mo'a Keet Shrine|Mo'a Keet]]||[[Breath of the Wild: Metal Makes a Path Trial|Metal Makes a Path]] |
|- | |- | ||
| − | | Shae Mo'sah||Swinging Flames | + | | [[Breath of the Wild: Shae Mo'sah Shrine|Shae Mo'sah]]||[[Breath of the Wild: Swinging Flames Trial|Swinging Flames]] |
|- | |- | ||
| − | | Shora Hah||Blue Flame | + | | [[Breath of the Wild: Shora Hah Shrine|Shora Hah]]||[[Breath of the Wild: Blue Flame Trial|Blue Flame]] |
|- | |- | ||
| − | | Sah Dahaj||Power of Fire | + | | [[Breath of the Wild: Sah Dahaj Shrine|Sah Dahaj]]||[[Breath of the Wild: Power of Fire Trial|Power of Fire]] |
|} | |} | ||
| Line 342: | Line 342: | ||
| align="center" style="background:#f0f0f0;"|'''Notes''' | | align="center" style="background:#f0f0f0;"|'''Notes''' | ||
|- | |- | ||
| − | | Dah Hesho||A Minor Test of Strength | + | | [[Breath of the Wild: Dah Hesho Shrine|Dah Hesho]]||[[Breath of the Wild: A Minor Test of Strength Dah Hesho Trial|A Minor Test of Strength]] |
|- | |- | ||
| − | | Katosa Aug|| | + | | [[Breath of the Wild: Katosa Aug Shrine|Katosa Aug]]||[[Breath of the Wild: Katosa Aug Apparatus Trial|Katosa Aug Apparatus]] |
|- | |- | ||
| − | | Ze Kasho||Ze Kasho Apparatus | + | | [[Breath of the Wild: Ze Kasho Shrine|Ze Kasho]]||[[Breath of the Wild: Ze Kasho Apparatus Trial|Ze Kasho Apparatus]] |
|- | |- | ||
| − | | Tutsuwa Nima||A Major Test of Strength | + | | [[Breath of the Wild: Tutsuwa Nima Shrine|Tutsuwa Nima]]||[[Breath of the Wild: A Major Test of Strength Tutsuwa Nima Trial|A Major Test of Strength]] |
|- | |- | ||
| − | | Ke' | + | | [[Breath of the Wild: Ke'nai Shakah Shrine|Ke'nai Shakah]]||[[Breath of the Wild: A Modest Test of Stength Ke'nai Shakah Trial|A Modest Test of Strength]] |
|- | |- | ||
| − | | Zuna Kai||Zuna Kai's Blessing | + | | [[Breath of the Wild: Zuna Kai Shrine|Zuna Kai]]||[[Breath of the Wild: Zuna Kai's Blessing Trial|Zuna Kai's Blessing]] |
|- | |- | ||
| − | | Tu Ka'loh||Tu Ka'loh's Blessing | + | | [[Breath of the Wild: Tu Ka'loh Shrine|Tu Ka'loh]]||[[Breath of the Wild: Tu Ka'loh's Blessing Trial|Tu Ka'loh's Blessing]] |
|- | |- | ||
| − | | Ritaag Zumo||Ritaag Zumo's Blessing | + | | [[Breath of the Wild: Ritaag Zumo Shrine|Ritaag Zumo]]||[[Breath of the Wild: Ritaag Zumo's Blessing Trial|Ritaag Zumo's Blessing]] |
|} | |} | ||
Latest revision as of 14:50, 20 May 2021
This page has a list of all the Shrines and Trials in The Legend of Zelda: Breath of the Wild.
Contents
- 1 Great Plateau Tower Shrines
- 2 Dueling Peaks Tower Shrines
- 3 Hateno Tower Shrines
- 4 Lanayru Tower Shrines
- 5 Faron Tower Shrines
- 6 Lake Tower Shrines
- 7 Wasteland Tower Shrines
- 8 Gerudo Tower Shrines
- 9 Central Tower Shrines
- 10 Ridgeland Tower Shrines
- 11 Tabantha Tower Shrines
- 12 Hebra Tower Shrines
- 13 Woodland Tower Shrines
- 14 Eldin Tower Shrines
- 15 Akkala Tower Shrines
- 16 Shrines Map
Great Plateau Tower Shrines[edit]
| Name | Notes |
| Oman Au | Magnesis Trial |
| Ja Baij | Bomb Trial |
| Owa Daim | Stasis Trial |
| Keh Namut | Cryonis Trial |
4 Shrines
Dueling Peaks Tower Shrines[edit]
9 Shrines
Hateno Tower Shrines[edit]
7 Shrines
Lanayru Tower Shrines[edit]
9 Shrines
Faron Tower Shrines[edit]
8 Shrines
Lake Tower Shrines[edit]
6 Shrines
Wasteland Tower Shrines[edit]
12 Shrines
Gerudo Tower Shrines[edit]
| Name | Notes |
| Kuh Takkar | Melting Ice Hazard |
| Kema Kosassa | A Major Test of Strength |
| Sho Dantu | Two Bombs |
| Keeha Yoog | Keeha Yoog's Blessing |
| Joloo Nah | Joloo Nah Apparatus |
| Sasa Kai | A Modest Test of Strength |
6 Shrines
Central Tower Shrines[edit]
8 Shrines
Ridgeland Tower Shrines[edit]
7 Shrines
Tabantha Tower Shrines[edit]
| Name | Notes |
| Akh Va'quot | Windmills |
| Bareeda Naag | Cannon |
| Sha Warvo | Path of Hidden Winds |
| Voo Lota | The Winding Route |
| Kah Okeo | Wind Guide |
| Tena Ko'sah | A Major Test of Strength |
6 Shrines
Hebra Tower Shrines[edit]
13 Shrines
Woodland Tower Shrines[edit]
8 Shrines
Eldin Tower Shrines[edit]
9 Shrines
Akkala Tower Shrines[edit]
8 Shrines
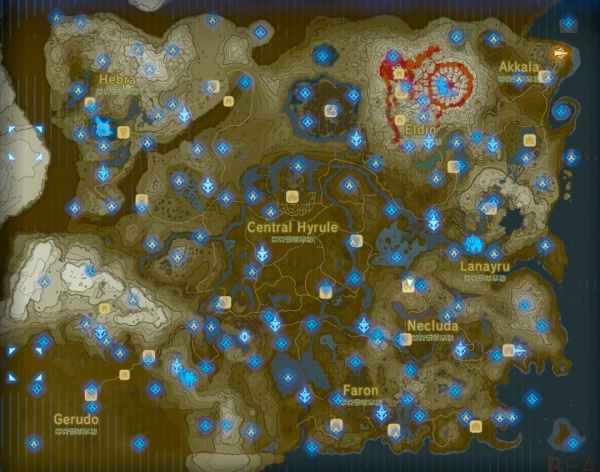
Shrines Map[edit]